Step-by-Step Witch's Hat Pattern Drafting for All Size for Halloween

Creating a custom-sized witch's hat pattern for Halloween is not only a creative endeavor but also a fantastic way to add a personal touch to your costume. Whether you're a seasoned seamstress or just starting out on your sewing journey, this tutorial will guide you through the exciting process of drafting your very own witch's hat pattern, tailored to fit any head size.
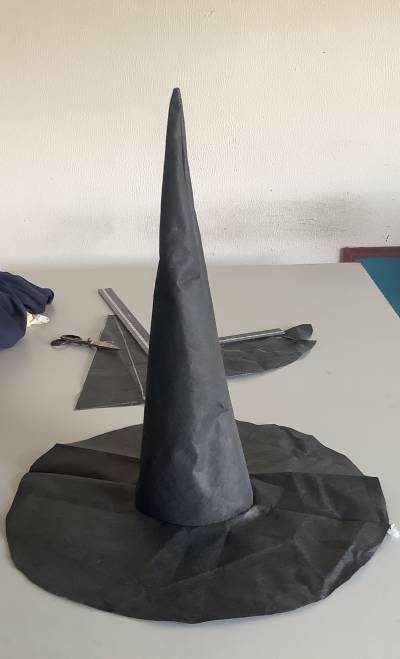
Halloween is a time of year when we get to let our imaginations run wild, and what better way to do that than with a whimsical witch's hat? It's a classic symbol of the season and adds an enchanting flair to your costume. With our step-by-step instructions, detailed images, and a helpful video, you'll be able to create a hat that perfectly suits your style and vision.
One of the most exciting aspects of this tutorial is its versatility. No matter the size of your head or the head you're making the hat for, our guide will walk you through the process of taking precise measurements and translating them into a customized pattern. Whether it's for yourself, a family member, or a friend, you'll have the satisfaction of knowing that your witch's hat will fit comfortably and securely.
We understand that not everyone has extensive experience in pattern drafting, so we've designed this tutorial to be accessible to all skill levels. Beginners can follow along and learn the fundamentals of pattern making, while more experienced sewists can enjoy the challenge of creating a unique design. We believe that the process of crafting your pattern can be as enjoyable as wearing the final creation.
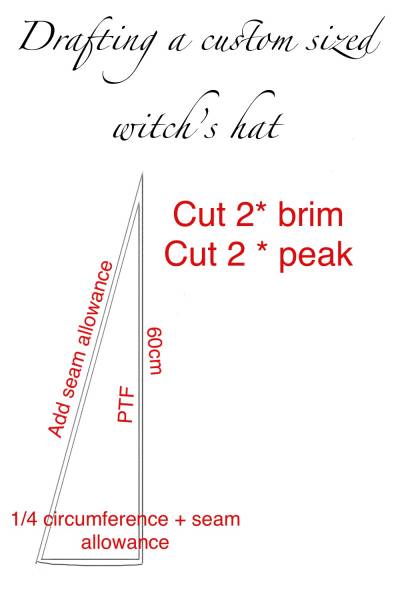
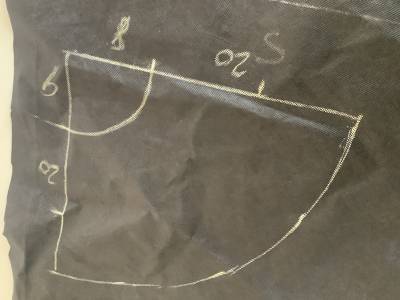
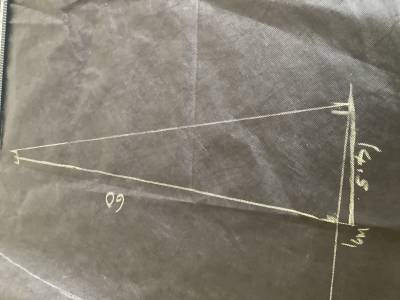
As you embark on this journey to create the perfect witch's hat, remember that the magic lies in the details. Our tutorial covers everything from measuring the head, determining the hat's height, and calculating the brim size to tips on selecting the right fabric and sewing techniques. By the time you finish, you'll not only have a one-of-a-kind hat but also a newfound appreciation for the art of pattern drafting.
So, whether you're preparing for a bewitching Halloween party, a night of trick-or-treating, or simply want to add a touch of enchantment to your wardrobe, join us in this exciting adventure of crafting your very own witch's hat pattern. Let's get started on creating a piece of headwear that will turn heads and cast a spell of creativity this Halloween season!
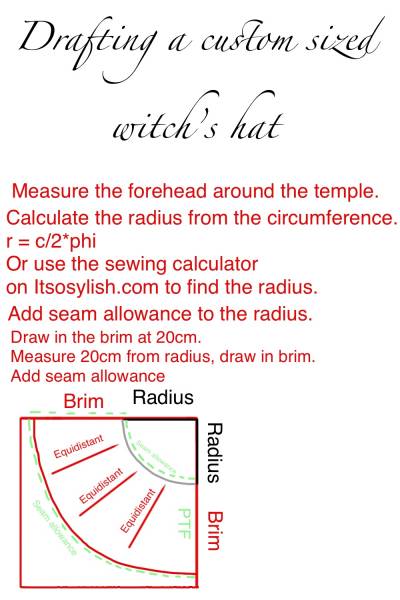
Step-by-Step :
The formula:
You can calculate the radius (r) of a circle from its circumference (C) using the following formula: You can calculate the radius (r) of a circle from its circumference (C) r=C divided by 2*πr r is the radius of the circle. C is the circumference of the circle. π (pi) is a mathematical constant approximately equal to 3.14159. Or you can use the sewing calculator on ItSoStylish.com to quickly calculate the radius or circumstance for any circle sewing pattern.