
Are you ready to take your sewing skills to the next level?
In this step-by-step tutorial, we’ll show you how to elevate a basic Knit T-shirt sloper pattern into a customized masterpiece. By the end of this guide, you’ll be able to create a uniquely tailored T-shirt that fits you like a glove and features eye-catching details like fullness, flare, and contoured panels. The tutorial will also demonstrate how to adjust the sleeves into fashionably narrow three-quarter points.
Step 1: Get Your Measurements
Before diving into the creative process, the first crucial step is to get your body measurements. A well-fitting garment starts with accurate measurements. You’ll want to know your bust, waist, hip, and other relevant measurements to ensure your final T-shirt hugs your curves perfectly.
Step 2: Generate Your Custom Pattern
Once you have your measurements in hand, head to the Knit T-shirt webpage where you’ll find a convenient form to input your custom size. This form will be the key to generating an individual sewing pattern tailored specifically to your body. Gone are the days of settling for off-the-rack sizes that don’t quite fit right – this pattern will be uniquely yours.
Step 3: Adding Flare and Panels
Now comes the fun part! Our tutorial will guide you through the process of taking your basic sloper pattern and transforming it into something extraordinary. We’ve included detailed explanations, images, and even a helpful video to ensure you grasp every step of the process.
- Add flare for a playful look.
- Create contoured panels for a touch of sophistication.
Step 4: Making Your Custom Pattern
Once you’ve added your desired elements to the basic sloper, we’ll show you how to translate it into a new custom pattern that reflects your personal style. This pattern will be a reflection of your creativity and preferences, making it a truly one-of-a-kind piece.
Step 5: Cutting and Sewing
With your custom pattern in hand, we’ll guide you through the final steps – laying it out on your chosen jersey fabric, cutting it out with precision, and expertly sewing it together.
Are you excited to embark on this creative journey? Grab your measuring tape, visit the Knit T-shirt webpage, and let’s transform that basic sloper into a customized masterpiece. Get ready to enjoy the satisfaction of wearing a T-shirt that’s uniquely your own!
Let’s get started!
Drafting the Pattern from the Basic Sloper Knit T-shirt
Adding fullness, flare and contouring to a basic sloper sewing pattern:
- Draw a line to divide the Knit-T-shirt Sloper into 2 panels. Start at the midpoint of the shoulder, pass through the midpoint of the bust, then curve it straight to the hem.
- Draw a horizontal line across the pattern at the nape-to-waist measurement plus 1 cm.
- Cut the pattern along the panel line into 2 pieces. Trace these onto temporary pattern paper like Spunbon.
- On the side panel, curve the side seam in by 2.5 cm at the waist, and flare it out 2.5 cm at the hem. Draw to desired length.
- On the front of the side panel, curve the waist in by 1 cm and flare 2.5 cm at the hem. Draw to desired length.
- On the center panel, curve the waist in by 1 cm and flare out 2.5 cm at the hem. Draw to desired length.
- Draft the V-neck facing using a separate tutorial. Add seam allowance and cut out the new pattern.
- Trace the sleeve onto temporary paper like Spunbon.
- Mark the desired sleeve length on the fold line.
- Draw a line to a point 2.5 cm inside the underarm line to create a point.
- Join the point to the underarm.
- Add seam allowance and cut out the sleeve pattern.
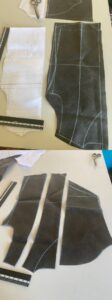
Cutting the Pattern
![]()
Adjusting the basic sloper and preparing fabric pieces:
- Use lightweight jersey fabric like cotton knit or Bon Bon – fabrics that drape well for a flared silhouette.
- Cut 2 center front/back panels.
- Cut 4 side panels – 2 for each side.
- Cut a pair of sleeves.
- Cut the V-neck facing and front mid-panel neckline.
Sewing the New Fit and Flare T-shirt
Use an overlocker or serger for best results:
- Sew the back side panels to the center-back panel, right sides together.
- Sew the front side panels to the center-front panel, right sides together.
- Overlock the back neckline and the facing edge.
- Sew the facing to the front neckline. Turn it to the right side.
- Hem the back neckline.
- Sandwich the back neckline side edge between the front neckline edges and sew the shoulder seams.
- Notch the midpoint of the sleeve cap. Pin to the shoulder seam.
- Sew the sleeves to the body, easing to fit.
- Sew the side seams and underarm in one smooth seam.
- Hem as desired – for a lettuce frill hem, use a differential feed overlocker, smallest stitch, and gently stretch the hem as you sew.
- Steam press and enjoy your custom-made T-shirt!
Leave a Reply