
Embroidery: Print Actual Size
A simple, easy-to-sew Lovie/Comforter for seamstresses with intermediate skills. The pattern is suitable for a variety of fabrics, but works especially well with stretchy materials like Minky, Polar Fleece, or stretch faux fur. Seam allowance of 6mm is included unless otherwise specified.
Download Patterns:
Fox blanket lovely
Equipment
- Sewing machine
- Polyester thread
- Embroidery thread (black, dusky pink, white, leaf green)
- Hand embroidery needle
- Polyester stuffing
- Half a meter of Minky, Polar Fleece, faux fur, cotton or felt
- Pins or wonder clips
- Tailor’s chalk or a heat/magic pen for marking facial features
Cutting and Layout
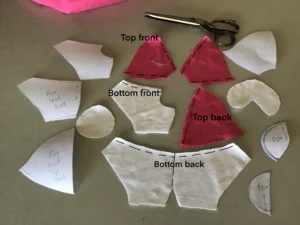
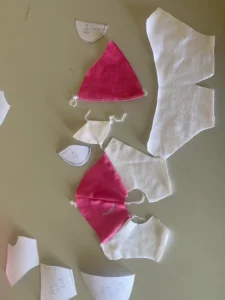
- 4 top head sections (fronts must have muzzle cut-out; backs do not)
- 4 bottom head sections (same as above)
- 1 muzzle lining (cut on the fold)
- 1 muzzle front (cut on the fold)
- 4 ears (cut on the fold)
- 2 lovey body sections
- 4 hands (add seam allowance)
- 4 feet (add seam allowance)
Sewing
- Sew the top head sections together.
- Sew the back bottom head sections.
- Sew the front bottom sections to the top front sections.
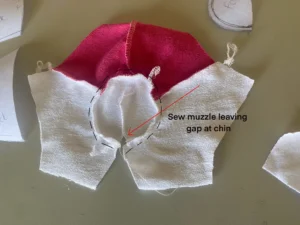
- Sew the muzzle dart, leaving a 2cm gap at the chin edge.
- Sew chin and neck closed.
- Sew the muzzle lining to the back of the muzzle, leaving a gap at the bottom to stuff it. Use a regular sewing machine for accuracy. Use a narrower seam allowance for the lining.
- Stuff the muzzle and close the opening.
- Sew the ears together and turn them right side out.
- Stay stitch or overlock ears to the head.
- Make an embroidery template for the eyes and features. Transfer design using your preferred method.
- Embroider the eyes with 6 strands of floss using back or stem stitch. Embroider the nose and smile.
- Optional: Watch the instructional video for embroidery tips. Embroidery is not essential, especially for newborns.
- Fold ears down. Lay the back of the head over the front, right sides together.
- Sew the back of the head to the front. Stuff the head and sew it closed at the base.
- Sew the back body section to the front, right sides together. Leave a gap (marked on pattern) for inserting the head.
- Sew the hands and feet. Turn right side out, stuff, and sew closed.
- Fit hands, feet, and head between front and back body sections. Overlock to secure.
Leave a Reply