Neckline Pattern Drafting Tiutorial for Knit Sloper Sweatshirt
Welcome to the first installment of our exhilarating journey into the world of pattern manipulation! If you're here, it's likely because you share our passion for sewing and pattern drafting. And what better way to start our creative adventure than by diving headfirst into the art of transforming a basic T-shirt sloper pattern into a canvas for your unique design dreams?
In this course, we are about to embark on a remarkable odyssey where you'll master the art of neckline manipulation using the versatile ItSoStylish custom T-shirt sloper pattern. We understand that the neckline is often the focal point of any garment, and with a little know-how, you can turn it into a statement piece that reflects your style and creativity.
Why Necklines Matter
Necklines play a pivotal role in shaping the overall look and feel of a garment. They can convey elegance, confidence, and personality. Whether you desire a classic crew neck, a daring V-neck, or a chic scoop neck, this course is your compass to navigate the vast sea of possibilities.
What to Expect
Throughout this series of tutorials, we've crafted a comprehensive learning experience for you. Each lesson is designed to be your guiding light as you transform the ItSoStylish T-shirt sloper into a personalized masterpiece. Here's what you can anticipate:
- Exploration of Neckline Styles: We'll introduce you to a diverse range of neckline styles, from the timeless to the avant-garde. You'll learn how to visualize your design and choose the perfect neckline to bring your vision to life.
- Pattern Alterations: Dive into the technical aspect of pattern manipulation. We'll guide you through the step-by-step process of modifying the sloper pattern to achieve your desired neckline.
- Sewing Techniques: Sewing is an art in itself. We'll provide detailed instructions and tips on how to execute your neckline alterations flawlessly, ensuring a professional finish.
- Visual Aids:We understand that learning by seeing is often the most effective method. That's why we've incorporated images and video tutorials to enhance your understanding of each concept.
By the end of this course, you'll not only have mastered the intricacies of neckline manipulation but also gained the confidence to experiment with other aspects of pattern drafting. Your journey into the realm of custom clothing design starts here.
So, grab your sewing tools, your imagination, and let's embark on this exciting adventure together. The ItSoStylish T-shirt sloper pattern is your blank canvas, and with the knowledge you'll acquire here, the possibilities are limitless. Get ready to redefine style, one neckline at a time!
Let's sew our way to creativity and craftsmanship like never before!
Setting Up to Draft a Custom T-shirt

Step-by-step:
- Print out : Download the PDF sewing sloper here. Print out your pattern and trace it to a piece of pattern paper.
- Add seam and hem allowance: Add seam allowance to the shoulder, side-seam neck and armhole of the main front and back. Add seam allowance to the cap of the sleeve and under-arm section. Add hem allowance to the base of the sleeve or shorten it to add rim trim by the width of the finished trim less seam allowance.
- Adjust the neckline with facing: Facing the neckline gives you the opportunity to adjust the basic sloper in a variety of fashionable ways.
- V-neck: Draw in a V point onto your traced pattern. The line should begin at 4cm away from the center-front line, forming a natural curved V-neckline (see image). Trace the neckline to a new sheet of pattern paper and draw in the facing for the
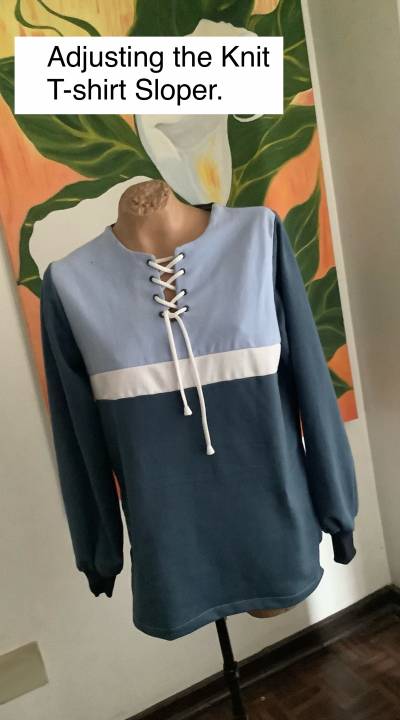
- V-neck. A good width is usually 9-10cm. Add seam allowance. Lace-up: Lower the front neckline as desired. Trace the shape of the neckline as shown in the image. Slit the neck down to desired length on both the main front of the garment and on the facing. Add seam allowance.
- Adding Interfacing: Depending on the weight of the fabric that you intend to use, you might need to use knit-specific fusing or interfacing to structure the neckline. Ask your fabric supply store to suggest a suitable interfacing for stretch fabric. If using medium or heavyweight fleece fabric or tracksuiting, it’s unnecessary to apply interfacing because the fabric has sufficient structure as is.

- Adding decorative color blocking: You can makeup the garment as is or you can refer to the Itsosylish color blocking tutorial to add fashionable interesting sections to your sloper pattern.
- Cutting the garment: Cut 1 back, 1 front, 2 sleeves and the facing that you’ve drafted. Slash the garment and add seam allowance if you want to color block.
- Sewing the garment :
- The facing : Stitch the facing to the neckline using a 1-1.5cm seam allowance. Use a medium length stitch on your sewing machine. Use ballpoint needles specifically designed to sew knitted fabric with tearing the fabric.
- Method : If sewing a lace up front, lay the facing on the neckline, rightsides together. Stitch around the front of the neckline and down the slit. Sew across the base of the slit forming a rectangle with square points at the base of the slit (see image)
- Slashing ease into the neckline: Ease the neckline by cutting notches into the rounded areas. Snip away the corner points of the slit (see image).
- Complete the garment : Sew any color blocking sections together. Sew the back to the front, rightsides together at the shoulder seams. Sandwich the back shoulder seam between the front neck facing (see image). Sew the sleeves to the armholes, rightsides together. Sew the underarm and sides in one fluid sweep. Overlock the hem. Hem the garment. Add rim trim to the sleeves or hem. Press the garment and punch studs into the neckline to hold the laceup tape.

- Add seam and hem allowance: Add seam allowance to the shoulder, side-seam neck and armhole of the main front and back. Add seam allowance to the cap of the sleeve and under-arm section. Add hem allowance to the base of the sleeve or shorten it to add rim trim by the width of the finished trim less seam allowance.