How to sew a button on A Comprehensive Guide to Sewing Buttons: Types and Techniques
Tips and tricks.
How to sew a button on A Comprehensive Guide to Sewing Buttons: Types and Techniques
A Comprehensive Guide to Sewing Buttons: Types and Techniques

Buttons are not only functional but also add a touch of elegance to garments and accessories. As a versatile fastener, buttons come in various shapes, sizes, and materials, catering to different sewing projects. In this blog, we'll explore the different types of buttons and provide step-by-step instructions on how to sew them on by hand and with a sewing machine. Whether you're a beginner or a seasoned sewing enthusiast, mastering the art of sewing buttons will enhance your sewing skills and elevate your creations.
Types of buttons
Buttons are available in a wide range of styles, and understanding the different types will help you choose the right one for your project:
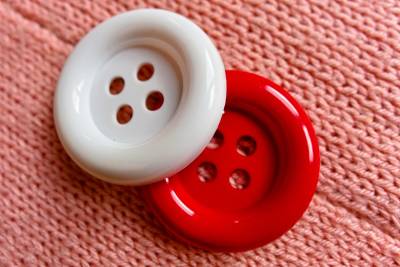
a. Flat Buttons: These are the most common buttons with two or four holes and a flat surface. They are suitable for various garments like shirts, blouses, and cardigans.
b. Shank Buttons: Shank buttons have a loop or shank at the back, making them ideal for thicker fabrics or garments where a raised button is preferred. They work well with coats, jackets, and heavy fabrics.
c. Sew-through Buttons: These buttons have holes that go through the button vertically. They are easy to sew on and are commonly used on shirts, blouses, and lightweight fabrics.
d. Toggle Buttons: Toggle buttons consist of a bar or rod-shaped button and a loop. They are excellent for fastening coats, vests, and bags.
e. Snap Buttons: Also known as press studs, snap buttons offer a secure and discreet closure. They are often used on clothing items that require frequent opening and closing.
f. Shank-less Buttons: These buttons lack a shank and are typically attached using a backing or wire. They are popular for decorative purposes on clothing and accessories.
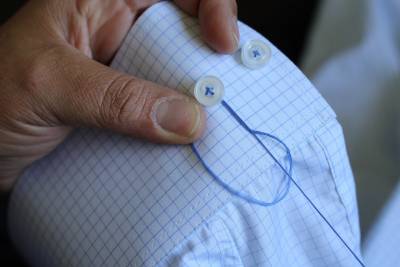
Sewing buttons by hand
Sewing buttons by hand is a fundamental sewing skill that every sewer should master. Follow these steps to sew on buttons securely:
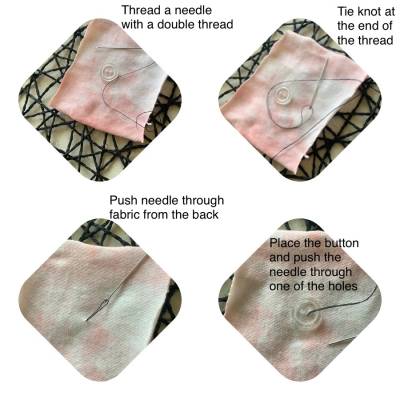
Step 1: Thread your needle with a double thread and tie a knot at the end.
Step 2: Position the button on the fabric, and for flat buttons, make sure the holes are aligned with your markings.
Step 3: Insert the needle from the backside of the fabric to the front, coming up through one of the buttonholes.
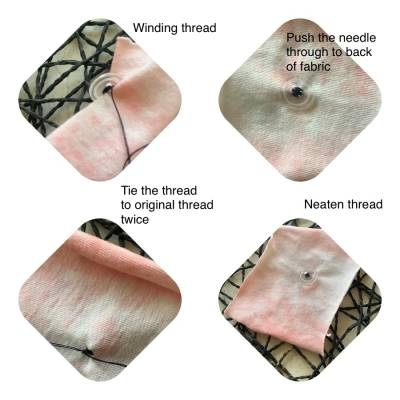
Step 4: Push the needle down through the opposite hole, creating a diagonal stitch.
Step 5: Repeat this process several times, making sure the button is firmly attached.
Step 6: To reinforce the button, create a few small stitches on the backside of the fabric and tie a knot.
Sewing buttons with a sewing machine
Using a sewing machine to attach buttons can be faster and more convenient. Many modern sewing machines come with a button-sewing foot. Here's how you can do it:
Step 1: Attach the button-sewing foot to your sewing machine.
Step 2: Place the fabric under the foot, positioning the button where you want it to be attached.
Step 3: Lower the foot to hold the button in place.
Step 4: Select the zigzag stitch on your machine, ensuring it matches the button's hole spacing.
Step 5: Begin sewing, and the machine will automatically create the necessary stitches to secure the button.
Step 6: After sewing for a few seconds, reverse the machine to lock the stitches.
Conclusion
Sewing buttons is a valuable skill for any sewing enthusiast. By understanding the different types of buttons and mastering both hand-sewing and sewing machine techniques, you can add a professional touch to your garments and accessories. So, next time you embark on a sewing project, confidently choose the right button and apply your newfound skills to create stunning and functional pieces. Happy sewing!