Ten Essential Steps to Draft Sewing Patterns
Tips and tricks.
Ten Essential Steps to Draft Sewing Patterns
Pattern drafting is an art that intertwines precision and creativity, allowing sewists to bring their unique clothing visions to life. In this article, we'll delve into the fascinating world of pattern drafting and explore the ten essential steps that lay the foundation for creating well-fitting and stylish garments from scratch.

Ten Steps to a Sewing Pattern
Creating Sewing Patterns
Pattern drafting isn't just about creating templates; it's a journey that demands a keen eye for detail and an understanding of how fabric drapes and shapes the human form. From taking accurate measurements to translating those measurements onto paper, each step in the process is a testament to the intricate dance between imagination and technical expertise. Whether you're an aspiring fashion designer or an avid sewing enthusiast, mastering these essential steps will empower you to turn your design dreams into reality. So, let's dive in and unravel the secrets behind successful pattern drafting!
- Choose a Design: Decide on the garment you want to create. It could be a dress, a shirt, pants, or anything else. Having a clear idea of the design will guide your pattern drafting process.
- Take Measurements: Accurate measurements are crucial for a well-fitting garment. Measure yourself or the person you're creating the garment for. Key measurements include bust, waist, hips, inseam, and more depending on the garment type.
- Create a Base Pattern: This is a basic template that corresponds to your measurements. You can use a commercial pattern block or create your own using your measurements. This forms the starting point for your pattern.
- Draw the Basic Silhouette: Using your base pattern, sketch the basic outline of the garment. This is the initial shape without any details. It's like creating a blank canvas for your design.
- Add Style Lines and Details: Decide on design elements like darts, seams, pleats, pockets, and any other features you want to include. Add these lines and markings to your basic silhouette.
- Slash and Spread: To create fullness or adjust the fit, you might need to slash your pattern along certain lines and spread or overlap the pieces. This is especially useful for designs with gathers or flares.
- Blend and Smooth: After making adjustments, blend the lines together smoothly to create a coherent and balanced pattern. This step ensures that the transitions between different parts of the pattern are seamless.
- Test the Toile/Muslin: Before cutting into your final fabric, make a test version (toile or muslin) using inexpensive fabric. This helps you identify any fit issues and make necessary adjustments without wasting your good fabric.
- Refine and Perfect: Based on the fit of the toile, make any additional adjustments to the pattern. This might involve tweaking seam placements, adjusting lengths, or correcting any issues.
- Finalize and Transfer: Once you're satisfied with the fit and design, transfer all the markings and adjustments to your pattern. This is the stage where you create the final pattern pieces that you'll use to cut your fabric.
Remember, pattern drafting is both a skill and an art, so don't be discouraged if it takes a bit of practice to master. Each garment you draft will teach you something new, helping you refine your technique over time.
How to Take Measurements
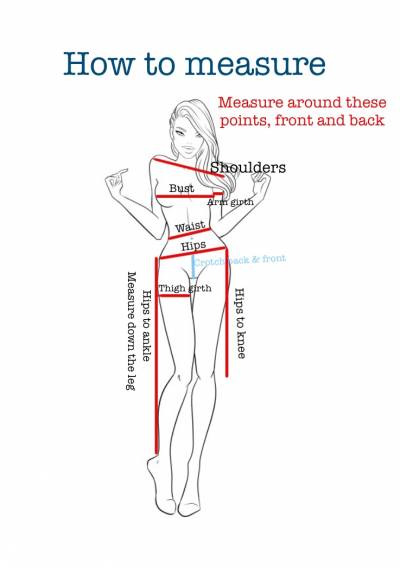
Taking accurate measurements is crucial for creating a well-fitting garment. Here's a step-by-step guide on the best way to take your measurements, along with the equipment you'll need:
Equipment Needed:
- Flexible Measuring Tape: Use a soft, flexible measuring tape made of cloth or plastic. It should be able to wrap around your body comfortably.
- Mirror: Having a full-length mirror can be helpful to ensure the tape is positioned correctly and the measurements are accurate.
- Paper and Pen: Keep paper and a pen handy to jot down your measurements as you take them.
Measurement Process:
- Wear Fitted Clothing: To get accurate measurements, wear close-fitting clothing or underwear that you would typically wear under the garment you're measuring for. This prevents any extra bulk that could affect the measurements.
- Stand Naturally: Stand in a relaxed, natural posture. Keep your weight evenly distributed on both feet.
- Use a Mirror: If possible, stand in front of a mirror to ensure that the tape is parallel to the ground and positioned correctly.
- Take Measurements in Inches or Centimeters: Choose a unit of measurement that you're comfortable with, whether it's inches or centimeters. Stick to the same unit throughout for consistency.
- Bust/Chest Measurement: For the bust measurement, wrap the measuring tape around the fullest part of your bust/chest. Make sure the tape is parallel to the ground and not too tight or too loose.
- Waist Measurement: Find your natural waistline, which is usually the narrowest part of your torso. Wrap the tape around your waist, keeping it comfortably snug but not tight.
- Hips Measurement: Measure around the fullest part of your hips, which is typically around the hip bone area. Ensure the tape is parallel to the ground.
- Inseam Measurement: To measure your inseam, stand with your feet slightly apart. Measure from the crotch area to the desired pant length, usually the ankle bone or the floor.
- Shoulder Width: Measure across the top of your shoulders, from one shoulder's edge to the other.
- Back Width: Measure across your back at the widest point, typically around the shoulder blades.
- Arm Length: For sleeve length, measure from the tip of your shoulder down to your wrist bone.
- Neck Circumference: Measure around the base of your neck where your collar would typically sit.
- Upper Arm Circumference: Measure around the fullest part of your upper arm, which is usually a few inches below the shoulder joint.
- Thigh Circumference: Measure around the fullest part of your thigh.
Remember, it's crucial to stand naturally and not suck in your stomach or pull the tape too tightly. The tape should have a snug yet comfortable fit. Having someone else help you measure can also ensure more accurate results. And don't get discouraged if you find variations in your measurements - it's normal for measurements to change due to factors like weight fluctuations and posture.
Building a Portfolio of Base Patterns
Building a portfolio of base patterns or slopers can be a valuable asset for a pattern maker. These base patterns serve as the foundation for designing and creating various styles of garments. Here are some essential types of base patterns or slopers you might consider including in your pattern portfolio:
- Bodice Sloper: This is the foundation for tops, blouses, dresses, and many upper body garments. It includes the basic shape of the torso, bust darts, and armhole shaping.
- Skirt Sloper: The skirt sloper forms the basis for various types of skirts, from A-line to pencil skirts. It defines the waist, hips, and hemline shaping.
- Pants Sloper: A pants sloper is crucial for designing different styles of pants, from tailored trousers to jeans. It includes the hip, waist, and crotch shaping.
- Sleeve Sloper: A sleeve sloper provides the basic shape for sleeves, allowing you to create different sleeve styles like short sleeves, long sleeves, and various cuff variations.
- Dress Sloper: A dress sloper combines elements of both bodice and skirt slopers. It's particularly useful for creating fitted dresses and one-piece garment designs.
- Bodysuit Sloper: A bodysuit sloper can be versatile, serving as the foundation for one-piece garments, swimwear, leotards, and other fitted styles.
- Jacket Sloper: If you're interested in outerwear, a jacket sloper forms the basis for various jacket and coat designs. It includes shaping for the torso, arms, and shoulders.
- Knitwear Sloper: A sloper designed specifically for knit fabrics takes into account the stretch and drape of knits, making it easier to create well-fitting knit garments.
- Children's Slopers: If you're interested in designing for children, consider creating slopers tailored to children's proportions for various garment types.
- Plus-Size Slopers: Having slopers specifically designed for plus-size bodies can expand your portfolio's versatility and inclusivity.
Remember, the goal of a base pattern or sloper is to create a well-fitting foundation that you can build upon for different styles. Each sloper should be carefully tested and refined to ensure accurate fit and proportions. Including a range of slopers in your portfolio demonstrates your versatility as a pattern maker and your ability to design for various body types and garment styles.
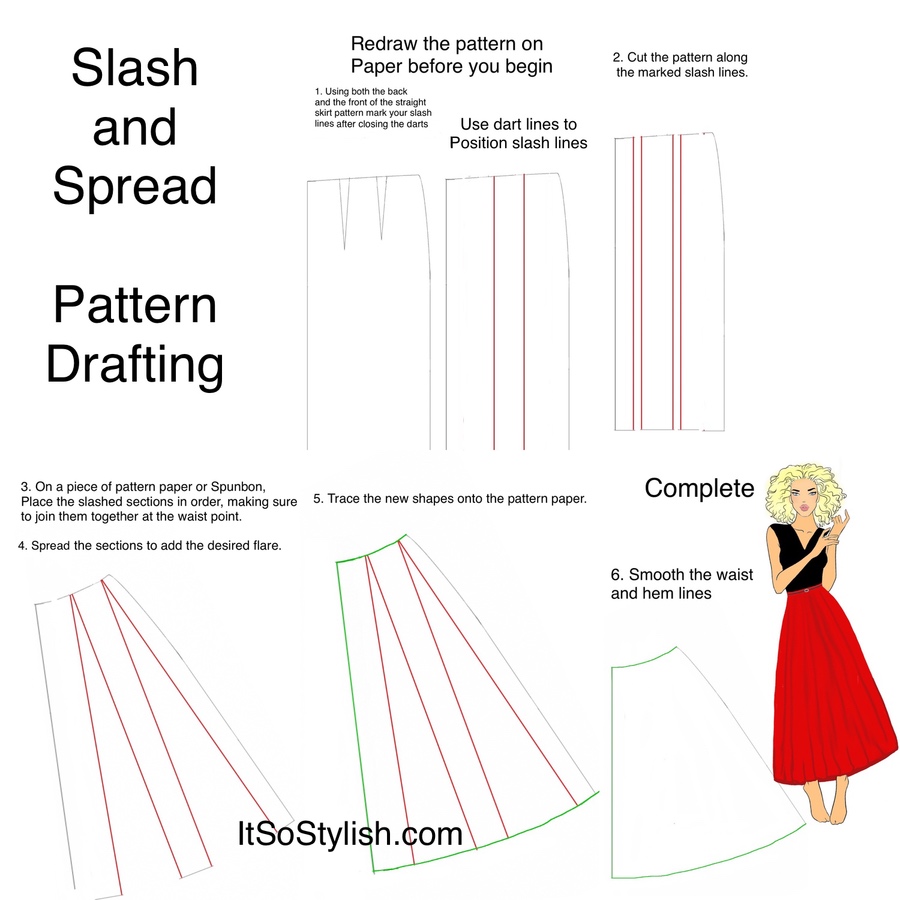
How to Slash and Spread
Let's walk through the process of turning a straight skirt pattern into a flare skirt using the slash and spread method:
Materials Needed:
- Straight skirt pattern (front and back)
- Paper for tracing and spreading
- Ruler
- Pencil
Steps:
- Prepare Your Straight Skirt Pattern: Start with the basic straight skirt pattern that you want to transform into a flare skirt. This pattern should include both the front and back pieces.
- Choose Where to Add Fullness: Decide where you want the flare to begin. Typically, it's at the hip level or slightly below. Mark this point on both the front and back pattern pieces.
- Draw Cutting Lines: From the marked point, draw a straight line perpendicular to the waistline on both the front and back pattern pieces. These lines will serve as cutting lines.
- Slash the Pattern: Cut along the lines you just drew, starting from the side seam and stopping just before the waistline. This creates "hinges" at the waistline.
- Spread the Pattern: Gently spread the bottom edges of the slashed pattern pieces apart. The more you spread, the more flare you'll add. You can start with a small spread and increase it gradually until you achieve the desired flare.
- Maintain Waistline Alignment: As you spread the pieces, the waistline will gap open. Use additional paper underneath to fill in the gaps and maintain a smooth waistline curve.
- Tape in Place: Once you've achieved the desired flare, tape the spread pattern pieces onto the additional paper. Make sure they're secure and aligned properly.
- Redraw Side Seam: With the flare added, the side seam of your pattern will now be uneven. Use a ruler to redraw a smooth side seam line, connecting the top and bottom edges of the spread pattern pieces.
- Adjust Hemline: Depending on how much you've spread the pattern, the hemline might also need adjustment. Redraw the hemline smoothly, curving from the original hem to the new edges.
- Check for Balance: Ensure that both the front and back pattern pieces have been spread and adjusted equally to maintain balance in your skirt.
- Blend and Smooth: To create a seamless transition between the original pattern and the added flare, blend the lines where the pieces were spread. This ensures that the flare looks natural and well-integrated.
- Trace the New Pattern: Once you're satisfied with the new flare skirt pattern, trace it onto fresh paper to create your final pattern piece.
How to Slash and Spread From the Waist
Remember, practice makes perfect. It's a good idea to try this method on scrap paper a few times before working on your final pattern. Also, keep in mind that the slash and spread method can be applied to various patterns, not just skirts, allowing you to create different shapes and styles by manipulating your base patterns.